Windows10配置Rust开发环境

0x0. 相关概念

1). channel

Rust 发布在三个不同的 channel 上:stable、beta、nightly,简单说就是三种不同的版本。

  • stable:Rust 的稳定版本,每 6 周发布一次。
  • beta:Rust 的公开测试版本,将是下一个 stable 版本。
  • nightly:每天更新,包含以一些实验性的新特性。

2). toolchain

一套 Rust 组件,包括编译器及其相关工具,并且包含 channel,版本及支持的平台信息。

3). target

指编译的目标平台,即:编译后的程序在哪种操作系统上运行。

4). component

toolchain 是由 component 组成的。

查看所有可用和已经安装的组件命令如下:

1
rustup component list

rustup 默认安装的组件:

  • rustc:Rust 编译器。
  • rust-std:Rust 标准库。
  • cargo:包管理和构建工具。
  • rust-docs:Rust 文档。
  • rustfmt:用来格式化 Rust 源代码。
  • clippy:Rust 的代码检查工具。

5). profile

为了方便对 component 进行管理,使用 profile 定义一组 component。

不同的 profile 包含不同的组件,安装 rustup 时有三种 profile 可选:

Profile components
minimal rustc, rust-std, cargo
default rustc, rust-std, cargo, rust-docs, rustfmt, clippy
complete all

修改 profile 命令如下:

1
rustup set profile minimal

0x1. 下载 Rust

Rust 官网:https://www.rust-lang.org/tools/install

0x2. 安装 Rust

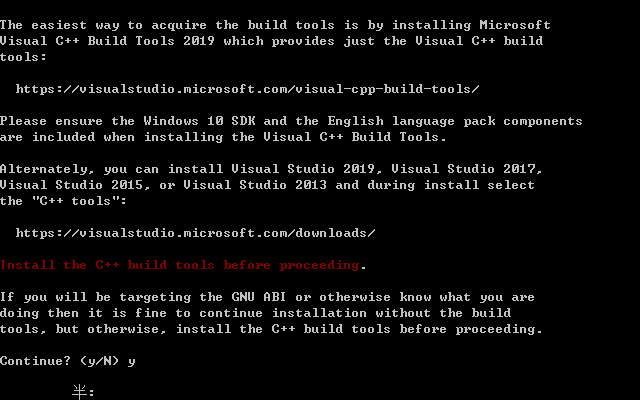
默认情况,Rust 依赖 C++ build tools,没有安装也关系。

这里我么选择 2,进行自定义安装。

输入:x86_64-pc-windows-gnu,其他的默认。

最后会确认安装信息,回车进行安装,会从网上下载文件,所以安装过程需要保证网络正常。

以下是一些常用的命令:

  1. rustup 相关
1
2
3
4
5
6
7
8
9
10
11
12
13
14
15
16
17
18
19
20
21
22
23
24
25
26
27
28
29
30
31
32
33
34
35
36
37
38
39
40
41
42
# 显示当前安装的工具链信息
rustup show
# 检查安装更新
rustup update
# 卸载
rustup self uninstall
# 设置当前默认工具链
rustup default stable-x86_64-pc-windows-gnu
# 查看帮助
rustup -h
# -------------------------->配置工具链
# 查看工具链
rustup toolchain list
# 安装工具链
rustup toolchain install stable-x86_64-pc-windows-gnu
# 卸载工具链
rustup toolchain uninstall stable-x86_64-pc-windows-gnu
# 设置自定义工具链
rustup toolchain link <toolchain-name> "<toolchain-path>"
# -------------------------->配置一个目录以及其子目录的默认工具链
# 查看已设置的默认工具链
rustup override list
# 设置该目录以及其子目录的默认工具链
rustup override set <toolchain> --path <path>
# 取消目录以及其子目录的默认工具链
rustup override unset --path <path>
# -------------------------->配置工具链的可用目标
# 查看目标列表
rustup target list
# 安装目标
rustup target add <target>
# 卸载目标
rustup target remove <target>
# 为特定工具链安装目标
rustup target add --toolchain <toolchain> <target>
# -------------------------->配置 rustup 安装的组件
# 查看可用组件
rustup component list
# 安装组件
rustup component add <component>
# 卸载组件
rustup component remove <component>
  1. rustc 相关
1
2
# 查看rustc版本
rustc --version
  1. cargo 相关
1
2
3
4
5
6
7
8
9
10
11
12
13
14
15
16
# 查看cargo版本
cargo --version
# 新建项目
cargo new <project_name>
# 构建项目
cargo build
# 运行项目
cargo run
# 检查项目
cargo check
# 安装Rust二进制文件
cargo install
# 卸载Rust二进制文件
cargo uninstall
# 查看帮助
cargo -h

0x3. 配置工具链安装位置

在系统环境变量中添加如下变量:

CARGO_HOME 指定 cargo 的安装目录

RUSTUP_HOME 指定 rustup 的安装目录

默认分别安装到用户目录下的.cargo.rustup 目录

0x4. 配置国内镜像

1). 配置 rustup 国内镜像

在系统环境变量中添加如下变量:

1
2
3
# 字节
RUSTUP_DIST_SERVER:https://rsproxy.cn
RUSTUP_UPDATE_ROOT:https://rsproxy.cn/rustup

2). 配置 cargo 国内镜像

在 cargo 安装目录下新建 config 文件(注意 config 没有任何后缀),文件内容如下:

1
2
3
4
5
6
7
8
9
10
11
12
13
14
15
16
17
18
[source.crates-io]
registry = "https://github.com/rust-lang/crates.io-index"
replace-with = 'rsproxy-sparse'

[source.rsproxy]
registry = "https://rsproxy.cn/crates.io-index"
[source.rsproxy-sparse]
registry = "sparse+https://rsproxy.cn/index/"
[registries.rsproxy]
index = "https://rsproxy.cn/crates.io-index"
[net]
git-fetch-with-cli = true

# 设置代理
# [http]
# proxy = "127.0.0.1:8889"
# [https]
# proxy = "127.0.0.1:8889"

0x5. Windows 交叉编译 Linux 程序

目标服务器是 Linux(CentOS 7) 64bit, 所以我们添加的 target 应该是x86_64-unknown-linux-gnu(动态依赖) 或者x86_64-unknown-linux-musl(静态依赖)

解释:

  • 动态依赖:目标服务器需要包含动态依赖的相关库(用户共享库)

  • 静态依赖,目标服务器不需要包含相应的库,但是打包文件会更大些

    1). 添加需要的 target

1
2
rustup target add  x86_64-unknown-linux-musl

2). 在 cargo 安装目录下新建 config 文件(注意 config 没有任何后缀),添加的文件内容如下:

1
2
[target.x86_64-unknown-linux-musl]
linker = "rust-lld"

3). 构建

1
cargo build --target x86_64-unknown-linux-musl

0x6. 参考

  1. 官方指南:https://kaisery.github.io/trpl-zh-cn/